
 or this amazing airbrushed one. wow!
Option 2) Buy one from the bakery that looks like this:

Option 3) Buy the Wilton cake pan on Amazon for $15 and just bake and frost it like this:
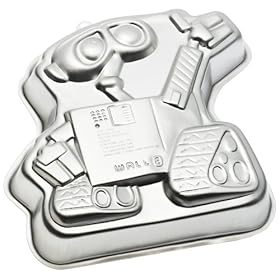

Option 4) Scour Google Images for ideas and follow someone else's homemade cake design that looks like this: (Thanks Hildebrand Family, I tried to leave a comment on your guestbook but couldn't figure it out.)


So here's how I did it. Using the above cake photo and image from the movie:

BAKE:
*2 cake batches: 1-square, 1-round and 1 9x13. I didn't use all of both batches, but having extra for mistakes was nice. Let cool completely!

PREPARE FROSTING/ICING:
*buy/borrow a box of Wilton gel icing colors (Walmart sells it) and mix two batches of buttercream icing and divide them into sections to be colored: (read here if you've never done cake decorating. I'm a total beginner so it was good to skim through and remember tips I'd been shown before)
[**Note: I thought this icing tasted yucky. I prefer all-butter buttercream frosting (like the one on the back of the box that I usually use). But that's just me. I'm not a shortening gal. In this case it was probably a good thing because I ate less of the cake that I would've otherwise!!
*For the record, I prefer the word "frosting" over "icing", but Wilton uses icing to describe what I call frosting. I'm with the writer of this article. Frosting is thick. Icing is thin. ]
golden yellow: body and arms
light grey: eyes and some details
dark grey: feet, hands, neck, "eyeballs", outlining around eyes
black: outline around "eyeballs", tread squiggles, speaker lines, detailing, lettering
white: arms stripes, E in red circle
red: red "E" circle
green: solar charge level (yellow works fine too if you don't want to mix/buy this one)
*I used black, golden yellow, red, and (would have used) kelly green to mix the above colors (I bought some tubes of black and red and green at the last minute because I wasn't certain how the mixed colors would work but it turned out fine and I only used the green tube for the "solar charge level".) To get the dark grey I mixed in a couple shakes of baking cocoa to darken it up a bit before tinting it with black (a tip from the Wilton site: use chocolate frosting).
*At the end I ended up with extra yellow icing and barely enough dark grey. So here's my recommended/revised proportions:
1st batch: 1/2 yellow and 1/2 dark grey
2nd batch: 1/3 light grey, 1/3 black, remainder blob into custard dishes for white, red, green(optional) Hopefully these proportions work for you!
*I used a simple cake decorating kit (tips and a bag) that I'd bought years ago and never opened. I also used sandwich ziploc bags with the corner snipped off for the tiny amounts of icing (red, white).
SHAPING:
*cut the cakes (you can use all the same kind, I mixed the two because that's what I had on hand) into body, "feet", eyes/head, neck, arms, hands. This took some experimenting and eyeballing. I used the largest cutting board we have and placed foil over it. Something bigger would've given me more room for his neck/head area.

*The eyes/head were a bit tricky. I used the round cake to help with the shaping, but you could do the same with any cake shape. Cut a template if you want to get it perfect. For all the body parts that were "symmetrical" I stacked the pieces on top "right sides together" (kind of like cutting fabric) so I'd end up with both sides mostly the same.
* Note: the arms are two pieces each: a little rectangle base for the longer arm piece to hang over the edge and rest on. For the neck I rounded the corners by slicing them off lengthwise
*Arrange cakes on your board until it looks right. : )

FROSTING:
*remove the arranged parts to the side and frost the YELLOW square first (leaving the top 1/4 of his body for grey) and then adding his 2 arm pieces (no hands yet) and frosting those yellow as well. My cakes were pretty crumby (ha ha) so it took some tricky spreading skills to get things smooth and crumb free. I added tiny bits of milk to get a smoother spreading consistency as my icing had dried a little. Be careful not to get it too runny! Tiny drops of milk go a long way.
*DARK GREY: frost feet and hands on a separate surface and then place on cake (unless you can figure out a better way). Frost the top of the body and the neck.
*LIGHT GREY: frost inside corners of eyes then scoot in place to frost the rest.

DETAILS:
*This is the fun part now that the tedious base coat is down. : ) Be creative and do whatever looks good. I was a little short on time at this point so sadly I had to rush the fun part. Otherwise I would've remembered to add the red "record" button by the speaker, the dot between the red E and the black letters, and curve the letters rather than angle them. Obviously I changed the name a bit a la the professional cake at the beginning of this post.
I used a medium(?) straight tip for the black in a regular pastry bag since there was a lot of it and just a tiny snip from baggie corners for the white, red and dark grey. These were little blobs of a few tablespoon amounts of color in the baggie. More like a 1/4c. for the dark grey.
For the eyeballs I squeezed them on from the bag and smoothed out a bit before outlining.

"TADAH!" --Wall-E (my favorite line!)
Whew! Now, wasn't that fun?! There's many ways to improve upon this I'm sure. Good luck! I'm glad I'm not a professional otherwise I would be worried it'd show up on Cake Wrecks and get burned! I was seriously thinking about her blog the whole time I was doing this. I even looked up her Wall-E posts to see what she had to say about the bakery version.


